UV Radio Room is an application for companion computer of MAVLink-based autopilots such as ArduPilot or PX4 that brokers communication between the autopilot and an Internet modem or Iridium Short Burst Data (ISBD) transceiver. Together with UV Hub server it provides two-way communication link between unmanned vehicles and ground control stations such as QGroundControl or Mission Planer.
System Requirements
UV RadioRoom system requires the following hardware and software:
- Autopilot such as Pixhawk with ArduPilot or PX4 firmware;
- Raspberry Pi computer with Raspbian Stretch Desktop or Light;
- Activated RockBLOCK Mk2 or RockBLOCK 9603 Iridium satellite communication module with FTDI USB to UART cable.
- Cellular or satellite Internet modem.
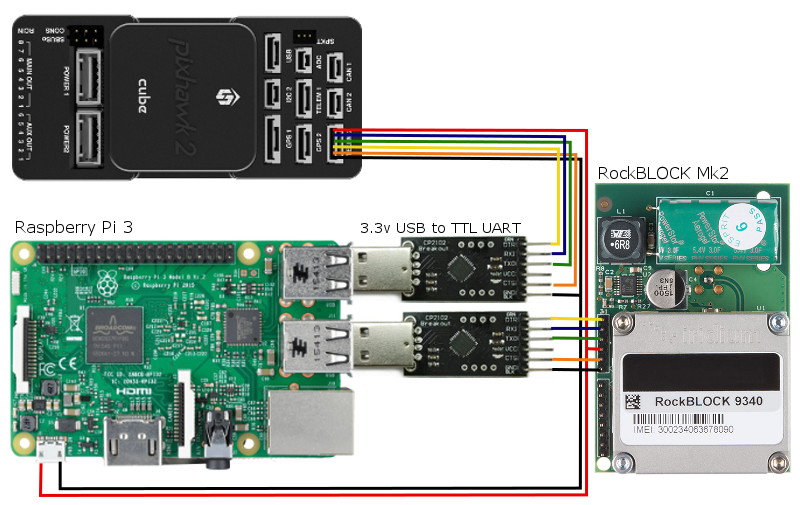
Wiring
UV Radio Room uses serial devices to communicate with autopilot and ISBD transceiver. Cellular or satellite Internet modems could be connected using USB, Ethernet, or Wi-Fi connections.
See the instructions on connecting companion computer to Pixhawk running ArduPilot and PX4 autopilots:
The safest bet is to use USB to TTL UART serial converter to connect both autopilot and transceiver to the Raspberry Pi’s USB ports. Another, less straightforward option is to connect autopilot to the Raspberry Pi serial port using GPIO pins.
It is recommended to connect RockBLOCK module using FTDI USB to UART cable provided by Rock Seven Mobile. 3.3.V FTDI cables or chips from other vendors can also be used, but MaxPower field in the chip must be set to 500 mA to satisfy the power requirements of RockBLOCK (The default setting for MaxPower field is typically 100 mA). Alternatively, RockBLOCK could be powered by directly, and not through the FTDI chip.
Connect the cellular or satellite Internet modem to Raspberry Pi as recommended by the modem manufacturer. The modems are not shown on the diagram.
UV Radio Room 2.2 supports only version 1.0 of MAVLink protocol. Make sure that SERIAL0_PROTOCOL and SERIAL1_PROTOCOL or SERIAL2_PROTOCOL on-board parameters are set to 1.
Though +5V TELEM pin on Pixhawk is rated for up to 2A peak power draw, it is recommended to power Raspberry Pi using a dedicated power source, especially if both RockBLOCK and the cellular modem are powered from the Raspberry Pi USB ports.
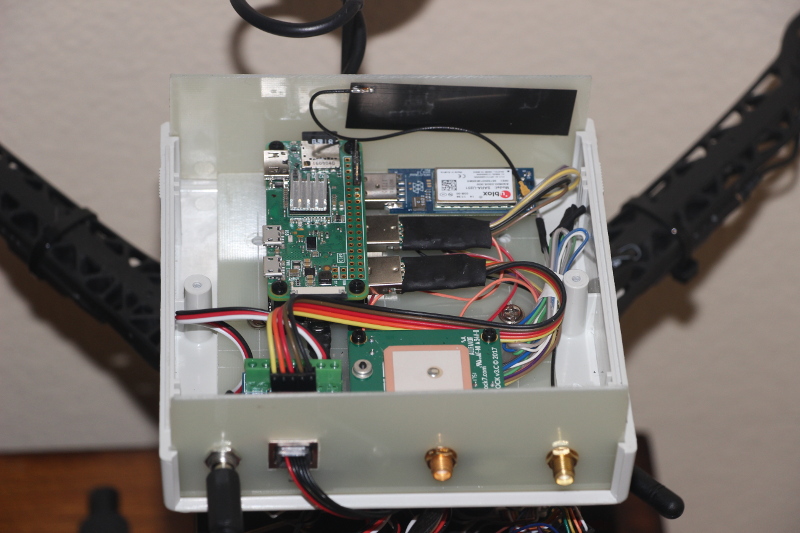
Radio Room setup with Raspberry Pi Zero W, RockBLOCK 9603, and Hologram Nova modem
Installing
To install Radio Room on Raspberry Pi:
- Copy radioroom-2.2.0-raspbian.deb to the Raspberry Pi.
-
Install radioroom-2.2.0-raspbian.deb package.
$ sudo dpkg -i radioroom-2.2.0-raspbian.deb - Configure the reporting period and the serial device paths for autopilot in /etc/radioroom.conf.
- If ISBD transceiver is used, in [isbd] section set enabled=true and specify the serial device paths of the ISBD transceiver in /etc/radioroom.conf.
- If TCP/IP connection is used, in [tcp] section set enabled=true and specify the TCP server’s IP address and port in /etc/radioroom.conf.
-
Start radioroom service.
sudo systemctl enable radioroom.service
sudo systemctl start radioroom.service
By default the serial device paths are set to /dev/ttyACM0 for autopilot and to /dev/ttyUSB0 for ISBD transceiver. If auto_detect_serials property is set to true, Radio Room can auto-detect autopilot and ISBD if they are available on other serial and USB devices. To make the RadioRoom startup faster and more reliable it is recommended to set the device paths correctly.
USB device paths /dev/ttyUSB0, /dev/ttyUSB1, … can swap after reboot. For USB devices it is recommended to use symlinks from /dev/serial/by-path or /dev/serial/by-path directories, that do not change with reboots.
Radio Room periodically reports the vehicle’s position, attitude, velocity, and other data using HIGH_LATENCY MAVLink message. The message size is 48 bytes. Each report consumes 1 RockBLOCK credit. The reporting period default value is 60 seconds. It can be changed by setting report_period configuration property in /etc/radioroom.conf.
Raspberry Pi requires an orderly shutdown procedure, otherwise the SD card may become corrupted and the system will no longer boot. To prevent the SD card corruption during power cuts it is recommended to configure Raspbian to work in a read-only mode. Alternatively, UPS and a shutdown circuit could be used to orderly shutdown Raspberry Pi after power cuts.
Troubleshooting
Run $ sudo systemctl status radioroom.service to check the status of radioroom service.
If radioroom is properly wired and configured, the output should look like this:
pi@raspberrypi:~ $ sudo systemctl status radioroom.service
● radioroom.service - UV Radio Room Service
   Loaded: loaded (/etc/systemd/system/radioroom.service; enabled; vendor preset: enabled)
   Active: activating (start) since Tue 2019-06-07 07:27:56 UTC; 6 days ago
     Docs: http://github.com/envirover/SPLRadioRoom
 Main PID: 254 (radioroom)
   CGroup: /system.slice/radioroom.service
           └─254 /usr/sbin/radioroom

Nov 07 07:27:56 raspberrypi systemd[1]: Starting UV Radio Room Service...
Nov 07 07:27:57 raspberrypi radioroom[254]: Starting UV Radio Room 2.2.0...
Nov 07 07:27:57 raspberrypi radioroom[254]: Connecting to autopilot (/dev/ttyUSB0 57600)...
Nov 07 07:27:58 raspberrypi radioroom[254]: Autopilot detected at serial device '/dev/ttyUSB0'.
Nov 07 07:27:58 raspberrypi radioroom[254]: MAV type: 12, system id: 1, autopilot class: 3, firmware version: 3.5.0/255
Nov 07 07:27:58 raspberrypi radioroom[254]: Connecting to ISBD transceiver (/dev/ttyUSB1 19200)...
Nov 07 07:27:58 raspberrypi radioroom[254]: IRIDIUM 9600 Family SBD Transceiver (IMEA 123456789012345) detected at serial device '/dev/ttyUSB1'.
Nov 07 07:27:58 raspberrypi radioroom[254]: UV Radio Room 2.2.0 started.
Log file of radioroom service is available at /var/log/radioroom.log.
Add -v option to the radioroom command line in /etc/systemd/system/radioroom.sevice to enable verbose logging. Verbose logging makes radioroom service log all MAVLink messages sent and received from autopilot and ISBD transceiver.
Building
To build radioroom on Raspberry Pi.
sudo apt-get install git cmake
git clone https://github.com/envirover/SPLRadioRoom.git
cd SPLRadioRoom
mkdir bin
cd bin
cmake ..
make
To create a debian package run $cpack .. command after that.
To cross-compile on Windows.
-
Install git and clone SPLRadioRoom repo.
$ git clone https://github.com/envirover/SPLRadioRoom.git - Install Windows toolchain for Raspberry Pi.
- Create ‘bin’ subdirectory inside SPLRadioRoom and change the current directory to it.
-
Run cmake using ../toolchain-arm-windows.cmake toolchain file.
$ cmake -G "Unix Makefiles" -DCMAKE_BUILD_TYPE:STRING="" -DCMAKE_TOOLCHAIN_FILE:FILEPATH="../toolchain-arm-windows.cmake" .. -
Run make.
$ make
For cross-compilation on Linux raspbian toolchain for Linux is required. toolchain-arm-linux.cmake should be specified as CMake toolchain file.